

Estimated reading time: 11 minutes
What is Multisite?
Previously, we completed the deployment of WordPress based on LEMP stack. Next, we'll delve into the configuration of WordPress Multisite. So, what exactly is Multisite? Simply put, Multisite allows running multiple independent WordPress websites on a single server, meaning you can operate multiple websites using the same WordPress setup, with each site having its own content, users, and permissions. For example, after creating this Blog site, if my friends or I want to open registration to allow more people to use it, and they require their own independent Blog sites with distinct styles, we can enable Multisite mode.
Introduction to Multisite Mode
WordPress Multisite enables the control and management of multiple websites within a single WordPress installation. Once enabled, the Multisite network allows the addition of new sites, utilizing installed themes and plugins. Each site can have its own independent content and users, but they share the same set of WordPress core files, plugins, themes and other resources.
The Multisite network is managed by Super Admins who have full control over all sites in the network, including adding and removing sites, installing plugins and themes, and executing updates across the entire network. Other Site Administrators in the network can only manage their own sites and cannot access other sites' data.
Types of Multisite Mode
WordPress Multisite currently supports two main types of Multisite configurations:
Subdirectory: This type of Multisite setup installs each website as a directory of the main site. For example, if your main site is https://example.com, then the subdirectory sites would be https://example.com/site1 and https://example.com/site2. This method is relatively simple and does not require special DNS configuration, usually suitable for websites that do not need independent domain names.
Subdomain: In this setup, each website uses a subdomain instead of a subdirectory. Compared to subdirectory, subdomain sites would use https://site1.example.com and https://site2.example.com. This method, in addition to site configuration, requires additional DNS configuration, namely adding A records or CNAME records for each subdomain, but it makes each site appear more independent.
My current site is using the subdirectory mode, so the following content will mainly introduce the configuration of subdirectory mode Multisite. I have not verified the feasibility of implementing the subdomain mode, so it is for reference only.
Subdirectory Mode Multisite
Enabling WordPress Multisite
Starting from WordPress 4.9.0, the Multisite feature is default off, so you need to manually enable it. Otherwise, you will not see the Network Setup option.
-
Modify wp-config.php: Log into the server, enter the website's root directory, and edit the wp-config.php file
sudo vim /var/www/blog.yourdomain.com/wp-config.php.
At the bottom of the file, there's a comment line/* That's all, stop editing! Happy blogging. */. Add the following code above this line, :/* Multisite */ define('WP_ALLOW_MULTISITE', true);Save and close the file, then go back to the website dashboard to start configuration.
-
Network installation: Log into your WordPress dashboard, go to “Tools” > “Network Setup”. Choose “Subdirectory” as the network type. Then follow the steps on the screen to complete the setup. You will need to enter the network's name, admin username and password, and your network address, which is used for the entire network.
-
Network configuration: After the installation, WordPress will provide a piece of code that needs to be added back to the wp-config.php file:
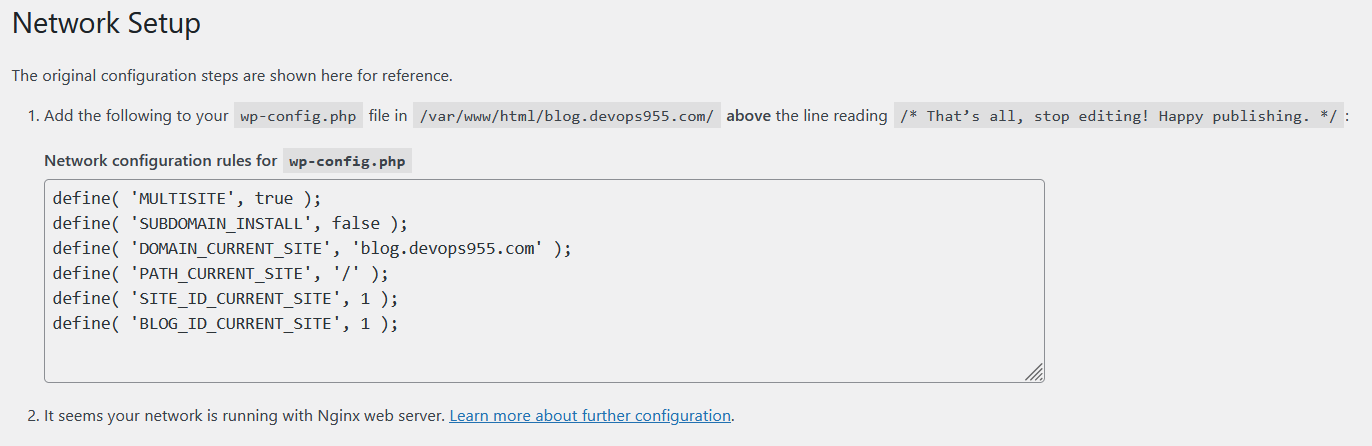
define( 'MULTISITE', true );
define( 'SUBDOMAIN_INSTALL', false );
// Replace blog.example.com with your domain.
define( 'DOMAIN_CURRENT_SITE', 'blog.example.com' );
define( 'PATH_CURRENT_SITE', '/' );
define( 'SITE_ID_CURRENT_SITE', 1 );
define( 'BLOG_ID_CURRENT_SITE', 1 );
Since we use the LEMP Stack, there's no Apache .htaccess configuration file to easily complete rewriting. Therefore, after creating it, you need to write rules in the Nginx configuration file to rewrite subdirectories (because the subdirectory actually reads the resources and settings of the WordPress main site, it does not really create different subdirectories and copy a complete set of resources).
Adding Sites
Before configuring Nginx, let's first add a sub-site, so we can then configure Nginx for validation.
-
Adding a sub-site: Log into your WordPress dashboard, go to “Network” > “Sites”, then click “Add New Site”.
-
Fill in the sub-site information: Enter the sub-site's name, title, and admin email as required.
Once filled, the new site will be https://blog.example.com/site1. Click “Add Site” to finish.
After setting, you can enter the site and set a password for the administrator on the users' page. (Later, you can try creating a feature to generate a random password and send it to the administrator's email, to further simplify management.)
Nginx Configuration
After adding the sub-site, we need to configure Nginx to enable access to the subdirectory; otherwise, you'll get a 404 error because this path does not actually exist.
-
Log into the server, edit the website's Nginx configuration file, located in the /etc/nginx/sites-available/ directory according to the previous article:
sudo vim /etc/nginx/sites-available/blog.your_domain.com -
Within the server block in the configuration file, add the rewrite judgment and forward the subdirectory requests to the WordPress main site:
#Subdirectory rewrite rules
rewrite ^/wp/([_0-9a-zA-Z-]+)/(xmlrpc\.php|wp-[0-9a-z-]+\.php) /wp/$2;
rewrite ^/wp/([_0-9a-zA-Z-]+)/(wp-(admin|content|includes).*) /wp/$2;
location / {
    index index.php index.html;
    try_files $uri $uri/ /index.php?$args ;
}
    rewrite /wp-admin$ $scheme://$host$uri/ permanent;  # Redirect subdirectory wp-admin to the main site wp-admin
#Subdirectory rewrite rules: If the requested file does not exist, try to rewrite the URL according to the WordPress Multisite structure
if (!-e $request_filename) {
rewrite ^/[_0-9a-zA-Z-]+(/wp-.*) $1 last;
rewrite ^/[_0-9a-zA-Z-]+.*(/wp-admin/.*\.php)$ $1 last;
rewrite ^/[_0-9a-zA-Z-]+(/.*\.php)$ $1 last;
}
####Another way: If there is a problem with the previous rule matching, you can try this one
#if (!-e $request_filename) {
#    rewrite /wp-admin$ $scheme://$host$uri/ permanent;
#    rewrite ^/[_0-9a-zA-Z-]+(/wp-.*) /wp$1 last;
#    rewrite ^/[_0-9a-zA-Z-]+(/.*\.php)$ /wp$1 last;
#}
####
#PHP handling part
location ~ \.php$ {
    include snippets/fastcgi-php.conf;
    fastcgi_read_timeout 3600s;
    fastcgi_pass unix:/var/run/php/php-fpm.sock;
    fastcgi_param SCRIPT_FILENAME $document_root$fastcgi_script_name;
    include fastcgi_params;
}
After you reload your nginx process, you should have completed all the configurations for the Multisite subdirectory mode. If there are still issues, you can refer to the official documentation and check and adjust according to your actual situation.
Subdomain Mode Multisite
This section is for those who need to enable subdomain sub-sites. If you have set up a subdirectory mode Multisite, this section can be ignored.
The method to enable subdomain mode is basically the same as the subdirectory mode. You need to modify the wp-config.php file to enable the Multisite feature, choosing the subdomain option as your network type during setup. The network configuration steps and adding sites are similar to the previous ones, so I'll skip directly (assuming there should be no problem based on the wordpress setup guide).
Nginx Configuration
- Modify the Nginx configuration file
sudo vim /etc/nginx/sites-available/blog.your_domain.com, add the following content in the server block:server { server_name blog.yourdomain.com *.blog.yourdomain.com; # Capture all subdomains root /var/www/blog.yourdomain.com; index index.php index.html index.htm; location / { try_files $uri $uri/ /index.php?$args; } location ~ \.php$ { include snippets/fastcgi-php.conf; fastcgi_pass unix:/var/run/php/php-fpm.sock; fastcgi_param SCRIPT_FILENAME $document_root$fastcgi_script_name; include fastcgi_params; } }
DNS Record Configuration
Each subdomain needs to have the corresponding records set at your DNS provider to be correctly resolved and accessed. For each sub-site, you will need to add an A record or CNAME record:
-
A Record: Point the subdomain to your server's IP address. For example, if your sub-site is site1.blog.yourdomain.com, you need to add an A record, directing site1 directly to your server's IP address.
-
CNAME Record: Point the subdomain to the main domain. This method is suitable if you do not want to directly expose the IP address or are using CDN services. For example, if your sub-site is site1.blog.yourdomain.com, you need to add a CNAME record, directing site1 to blog.yourdomain.com. (Note that some providers require entering just site1 for the CNAME, while others require the full site1.blog.yourdomain.com).
If wildcard records are supported, you can also use a wildcard record to replace, for example, directly pointing *.blog.yourdomain.com to the server IP or creating a CNAME. This simplifies subsequent configurations as you won't need to create a record for each sub-site.
Conclusion
By following the steps above, you should have successfully configured a WordPress Multisite. WordPress offers powerful and extensive features, allowing users to create, manage, and operate multiple websites from a single WordPress installation. This capability provides unprecedented flexibility and control for website administrators, making the management of a large number of related websites more efficient and simpler. Of course, the specific choice of how to use depends on your planning. As a personal website, the more your site grows, the more effort you will need to invest. Whether to use these features needs to be considered comprehensively. Finally, let's briefly summarize.
Benefits of Multisite Setup
-
Centralized Management: A Multisite network makes updating, managing, and maintaining multiple websites much simpler. Administrators can update core WordPress files, plugins, and themes from one dashboard, meaning all sites can be updated at the same time.
-
Resource Sharing: In a Multisite network, all sites can use the available plugins and themes, reducing the need for duplicate resources. This not only saves space but also ensures brand and design consistency, while sub-sites can also make certain adjustments according to personal style.
-
User Management: Multisite allows Super Admins to create and manage users across the entire network. Users can be granted different permissions on one or more sites, making user management more centralized and efficient.
-
Cost-Effectiveness: By sharing hosting and resources, a Multisite network reduces the cost of running multiple independent websites. This is a significant advantage for businesses or organizations with multiple related websites, and a good start for individuals or startups.
Challenges Faced
-
Increased Maintenance Work: Although a Multisite network simplifies many management tasks, Super Admins need to monitor and maintain the entire network, which can increase the workload. So be sure to determine your goals and be prepared before promoting.
-
More Complex Configuration: Setting up and managing a Multisite network is more complex than managing a single WordPress site. This includes the network setup, domain configuration, server configuration, and potential security issues.
-
Plugin and Theme Compatibility: Not all plugins and themes are compatible with a Multisite environment. This may limit the resources you can use and require additional time to test and adjust to ensure stability, after all, it's no longer just you using them.
-
Performance Considerations: Running multiple websites may put greater pressure on server resources. To maintain website performance, a more powerful server configuration or optimization strategies may be needed, which will also increase costs accordingly.
In conclusion, despite these challenges, WordPress Multisite remains a powerful platform. If you want to delve deeper into these contents, further study is possible. After overcoming the challenges in the middle, I believe this will greatly enhance your technical skills.
Reference links:
https://www.gingerdoc.com/tutorials/how-to-set-up-wordpress-multisite-on-ubuntu-20-04
https://computingforgeeks.com/how-to-setup-wordpress-multisite-network-nginx-letsencrypt/
https://developer.wordpress.org/advanced-administration/multisite/
https://developer.wordpress.org/advanced-administration/server/web-server/nginx/